The question of how to build in a dishwasher worries almost all owners of such a beloved household appliance, which greatly facilitates the life of any family. The first difficulties appear at the stage of choosing a model of built-in appliances that fit into the dimensions of the facade of the kitchen. In addition, the installation of the machine must be carried out correctly, since it is required to connect it without technical violations that could lead to emergency situations. An invited specialist can also connect the machine, but there is nothing difficult in the process itself - installing an embedded dishwasher with your own hands is available to everyone. Of course, you should first familiarize yourself with the instructions and training videos, this will help you do everything technically correctly.
Location selection
Videos and photos demonstrate the wide possibilities of embedded technology:
- Partially built-in - allowing you to see the equipment control panel, painted in the color of the facade. The size of the panel depends on the manufacturer's company (usual width is from 10 to 20 cm).
- Fully recessed - invisible due to the facade. It is usually used in classic-style kitchens. Such models often appear on video reports on the assembly of expensive kitchens.
The choice of a place for built-in appliances is determined by two parameters:
- the proportionality of the height and width of kitchen floor cabinets with the dimensions of the machine - not less than 45 cm and not more than 60 cm;
- proximity to sewer discharge - no more than one and a half meters. The latter is a prerequisite for manufacturing firms.
Most often, they try to install dishwashers in a base cabinet located next to the sink, since this is the most ergonomic and convenient. By the way, numerous videos from firms engaged in the development of kitchen furniture speak about this.
Choosing a model, it is worth starting from the size of the kitchen. Although the standard models are up to 60 cm wide, there are also narrow ones - up to 45 cm. Separately, it is worth noting models from Germany, in which 45 cm is not width, but height. Such a machine can fit into any, the smallest kitchen. Accommodation options are shown in the video on the manufacturers website.
![]() See also - How to connect a dishwasher with your own hands
See also - How to connect a dishwasher with your own hands
Installation process
Begin by preparing the cabinet in which the machine will be installed. Of course, it will be much more convenient when it is possible to connect the device at the time of assembling the kitchen, but for the most part, such a purchase occurs a little later, and the selected cabinet has to be moved out of the row.
Dismantling should start by unscrewing the screws holding the tabletop. Then the ties that hold the adjacent cabinets together are removed.After these actions, the cabinet itself freely moves forward. You do not need to disassemble the side walls with facades, but you will have to refuse the back wall, since it will interfere with the drain and water supply hoses.
Additional procedures
On the countertop, on the inside, it will correctly stick a special metallized film that protects the surface from the damaging effects of steam. Such precaution is not required only if the countertop is entirely made of artificial stone. Video producers clearly demonstrate the capabilities of the material.

We saw through a hole in the side wall (from the sewer side). Even if you have semi-professional equipment, it is not difficult to do it yourself. There is no need to make cuts round - it will be more convenient and reliable if they start near the wall itself - this will give the necessary freedom to the hoses and will allow to avoid breaks (for example, during repair). The correct drink can be seen in the video from the experts.
![]() See also - Choosing a compact tabletop dishwasher
See also - Choosing a compact tabletop dishwasher
Installation of the built-in dishwasher
You should start by adjusting the legs of the machine with the expectation that the device will fall almost to the floor.
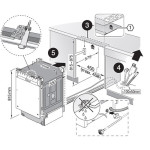
After adjusting the legs, the device, with hoses extended in advance, which should be connected to the communications through the prepared holes, is pushed into the resulting niche and set out in a horizontal plane with the help of adjustable supports.

In order to finally connect communications, you must:
- Secure the waste water hose. If the installation is done by hand, you must read the instructions - some models do not have a special check valve that prevents water from returning. In this case, the fitting should be correctly positioned. Usually the manufacturer indicates the maximum and minimum height (on average, 45-50 cm). To fix the nozzle, it is worth connecting an additional siphon connected to the water drainage system from the sink. (For beginners in plumbing who want to get it right the first time, we recommend the tutorial videos.) Installation of the drain ends with fixing the pipe, which guarantees the absence of creases.
- Connect the cold water supply hose. When connecting to a water supply system, you need to remember safety and use ball valves (stop valves). This will shut off the water in the event of any emergency or scheduled repair.
- Connect power supply. It is necessary to properly plan the supply of electricity even at the stage of repair. It is best to provide a separate wiring to the kitchen flap, but you can get by with ordinary outlets located 5-7 cm above the countertop or on the side surface of the floor cabinet. For an example, you should turn to video tutorials from kitchen collectors. All that remains is to put the front panel in place.
- The last step in installing a dishwasher with your own hands is checking the operation of all systems. For this, a test run is carried out with the obligatory use of a detergent, washing out any factory contamination inside the machine.
Important:
For a long and high-quality work, it is worth observing simple operating rules:
- "Rest" between washing cycles with the front door slightly open by 1 - 2 cm - at least 45 minutes. This will remove excess moisture.
- To prevent an emergency, after the completion of the dishwashing cycle, it is necessary to shut off the water supply tap.
- There is nothing complicated in connecting a dishwasher with your own hands, especially if you first familiarize yourself with the video and photo instructions
![]() See also - Dishwasher Care
See also - Dishwasher Care