If your household appliances are out of order, then you shouldn't say goodbye to them. You don't even need to take it to a service center. Instead, check out the instructions and tips to help you do your DIY Airfryer repair.. Common malfunctions have long been described, and the design is clear and not particularly complex, so you can get down to business.
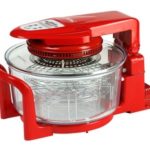
Constructive features of the airfryer
An airfryer is a kind of air draft oven, a mixture of a heater and a fan. A special grill serves as a heating element, which in turn is blown by air currents. The primary heat source is an infrared lamp. All of these critical parts are separated from the glass bowl where the food is placed.
The design usually consists of several elements:
- sealed glass bowl;
- quartz lamp, covered with a grate and slightly lowered into the bowl;
- a fan, consisting of lower and upper blades (the lower ones work to blow food, and the upper ones cool the motor);
- partitions between the blades with openings for air outlet;
- bimetallic plate for temperature control;
- control unit and display system.

The lid is usually equipped with a functional handle that completely disconnects the power when opened. Cooking starts only when the appliance is sealed. Problems may be associated with the listed elements, so do-it-yourself airfryer repair often begins with diagnostics.
Advice:
Read also: The washing machine does not heat the water - what should I do?
Common problems
Any repair of a do-it-yourself electric grill or similar device requires familiarity with the internal structure. The wiring diagram consists of a switch on the cover and a handle. From it, the signal goes through a timer to the motor that starts the fan. Relays and quartz lamps are connected in parallel.
You often have to face the following malfunctions:
- the device does not turn on and does not respond to control;
- the device heats up weakly;
- the fan of the airfryer does not spin;
- the main control unit has broken.
Typically, a chicken weighing about 1.5 kg is cooked for about 1 hour. The degree of readiness can be observed through transparent walls. If the terms noticeably increase, then this indicates possible malfunctions. There are other problems - the airfryer simply does not respond to pressing buttons or other malfunctions occur. But your device can still be repaired.
Causes of malfunctions and preparation for airfryer repair
The design of this device has already been considered above.It is not difficult, which allows you to quickly repair the air grill with your own hands. Usually one of the three main components breaks:
- thermal fuse;
- a heating element;
- Control block.

The third option is the most serious problem, because to repair the device in this case is quite difficult and expensive. In addition, only specialists should deal with restoration, but even they cannot guarantee a 100% result.
Damage to the thermal fuse and heating element can be easily fixed, and you can do it yourself with minimal knowledge and tools. For this, a multimeter is suitable, with which all elements are “called”.
Tip:
Read also: How to disassemble and repair the iron with your own hands
Do-it-yourself quick air grill repair
If the heating element fails, then you can just buy a new heater. An ordinary steel model is inexpensive and can last for a dozen years. However, the disadvantages include slow heating, high energy costs. You can spend a little more, but buy more efficient carbon or halogen heaters.
If the problem is a thermal fuse, then usually the air grill does not turn on at all. A short-term power surge in the network often leads to such a problem. Although before taking serious measures, it is better to check the socket and wiring.
Dismantling the air grill with your own hands is carried out in several stages:
- the lattice of a quartz lamp is unscrewed;
- the lower fan blades are dismantled;
- the partition between the blades is removed;
- the upper “cage” is removed (the motor of the device opens behind it);
- a quartz lamp is removed, fastened with brackets to the partition;
- if you need to replace the quartz lamp, you need to dismantle the cable connectors.

Before starting work, you should carefully inspect the body of the air grill and find all the screws that are hidden in deep grooves or behind decorative caps.
Steel blades should be removed from the rear, where the nut for gripping is usually located. So it will be much more convenient and safer.
Tip:
Read also: DIY sewing machine repair
Do not forget that before you start repairing your air grill, make a complete diagnosis. There are several reasons that can be misleading:
- the outlet is out of order;
- the device is incorrectly configured or the wrong mode is selected;
- the cover is not closed until it stops.
Sometimes it’s cheaper to replace one or another part than to buy a new air grill. You can repair it with your own hands quickly and efficiently.
![]() See also - What is better aerogrill or slow cooker?
See also - What is better aerogrill or slow cooker?
If you are repairing air grills at home, please contact. Defect: in the normal position, it began to work very loudly, and in the vertical position it was normal.