To connect the stove with your own hands, you need to properly study all the difficulties and features of this procedure. This is a very important process, any flaw here can cause irreparable consequences. In the event of a gas leak, you expose yourself to serious danger, just for this reason, you need to consult with specialists if you are unsure that you know how to properly connect the stove.
General points when connecting a gas stove
As a rule, the whole process when connecting gas stoves is carried out by an employee of the local gas services. When you think where it is better to turn for help, to which professionals, we recommend that you opt for the classic version - the state gas service. In this situation, you will not only be provided with all the required services, you will receive a guarantee of quality work plus all the necessary documents. Traditionally, in any best case, there are no continuous benefits - this also applies to gas services. The downside is the length of the installation - you may be waiting in line for more than seven days.
The price of services varies. It depends on many factors - the brand of the gas stove, whether there is electric ignition or not, and so on. To connect the electric ignition, you have to tinker with the electrical wiring. Such procedures will be considered additional, therefore, the payment will also be separate. Of course, you can start connecting the electric ignition on the gas stove on your own, if you have experience in similar work, thereby saving your money.

However, if you do not doubt your own skills, so you are going to do the work yourself, then it will be useful to get acquainted with information on how to connect a gas stove yourself, adhering to the safety manual and key requirements of gas services.
First of all, a beginner should get acquainted with the basic data on the gas pipeline in apartment-type buildings. Every apartment has a central pipe through which gas flows (usually referred to as the riser), which goes through the building from the lower floors to the upper. In the apartments from the riser there are pipes, which are called slopes. The gas stove is connected to the lowering by a metal pipe (in old houses) or a special gas hose (in new buildings).
Required tools and materials for installation
Before starting the installation, check that you have all the necessary tools and materials. You must have:
- open-end and adjustable wrenches;
- screwdrivers;
- Ball valve and new gas hose;
- gaskets;
- the cloth;
- soap solution and brush.

Dismantle the old plate
We dismantle the old stove and install a new stove in its place. Before dismantling, make sure that the gas valve is shut off on your pipe. If the gas is shut off, it is necessary to unscrew the lock nut that connects the stove and the lowering. This is not an easy matter, especially when the pipes are old, and more than one layer of paint is applied to them. When the nut does not turn, you can cut it off, and then unscrew what remains.
Then you will need to move the stove a certain distance so that it allows you to calmly connect a new gas stove. Next, the slope is removed, which is built into the lowering. For these purposes, one hand strongly fixes the crane, the other - twists it. Then it remains only to mount the plug on the pipe.
Gas valve replacement
The next step is to change the old crane to a new one. The old crane is unscrewed, however, it is not completely removed - at the first steps of installation, the crane will come in handy. This point of installation requires a lot of concentration and precise work, since some gas leakage occurs. Open the window wide, then get started. You will need a cloth dampened with water. Next, you need to disrupt the old tap, plug the hole with a wet cloth to shut off the gas. You won't fix the leak at all - understand this beforehand.
Then start preparing the thread. It should not have traces of rust and paint, debris or glue. After preparation, it is wrapped with a sealant, then the plug is removed. Gas begins to flow into your apartment, however, do not be afraid - when the tap is quickly tightened, the gas leak will become barely noticeable. Follow the safety measures - all sources of open flame or sparks are prohibited in the kitchen.

After this, a check of the connections for leaks is required. To do this, smear a soapy solution on the joint to monitor its reaction. Bubbles indicate a leak, which means that you will have to re-connect the gas stove until the leaks are completely eliminated.
In these moments, one should not be lazy and lose vigilance, because it is said about the safety of you and your apartment, especially when the actions are done by hand.
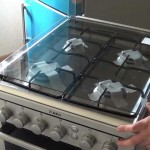
Installing a new gas stove
The last moment is the installation of the purchased gas stove. Before connecting it, you must carefully check the gas hose. Do not save on it, since an inexpensive low-quality hose will not last you a long time, you will constantly change it for a new one. Be careful - the hose outlet and the inlet on the new plate must match.

Let's talk about the installation itself. The sealant is wound on the fitting, namely on its external thread, before starting work, the thread is checked. Next, the fitting must be screwed into a ball valve, which is located in the lowering. Then you can screw the gas hose into the thread on the gas stove.
Now you run the leak check again as you did earlier. We apply a soapy solution, when there are no bubbles, then we can talk about the correct installation of the stove.
Types of electric ignition
Today, electric ignition is a standard feature of modern stoves. However, how do you install a stove with electric ignition yourself, while not violating safety during work with electric energy? Serious difficulties should not appear, you only need grounding and the outlet itself. In a modern outlet, today there is a neutral wire that acts as a ground. You just plug in the gas stove, and it's up to the end.
There are 2 types of electric ignition:
- mechanical electric ignition;
- automatic electric ignition.
When you install a new gas stove, the type of this device does not matter, so do not stop there. The main condition is the serviceability of the electrical ignition, as well as its constant functioning.

Even if you were able to independently install a gas stove in an apartment, a service worker should carry out control over the flow of gas - otherwise you will be left without gas, since you violate the instructions.
Important:
It is important to remember what kind of stove you need to install. If it is gas, then for the installation you will need to do one thing, if electric - then other work on its installation.
If you understand this, then everything is done quite simply. Supernatural knowledge and skills are not needed in order to independently perform this work. However, if you are afraid that you will not cope with the task, then we advise you to seek help from a specialist.